Welcome to the Irdest user manual
In this manual you will find setup instructions, basic concepts of how the Irdest network works, specific setup guides for various situations, and a usage reference of all Irdest user-tools.
The structure and proposed usage for this manual is described in "About this manual". If you're new to mesh networking, you should read the page "Concepts & Ideas" first!
About this manual
This manual is split into four sections:
- Explanation (mainly Concepts & Ideas)
- Installation, instructions on how to install Irdest tools on your system
- Setup guides, step-by-step configuration instructions for beginners
- "How to", instructions on how to do specific in-depth tasks for people with some Irdest experience
- Reference, look-up for different configuration values or behaviours
Building this manual
This manual is part of the main source repository and you can build it from the same nix environment as the rest of the project.
$ cd docs/users
$ mdbook build
If you want to enable live-reloading to work on this manual, you can also use the dev server.
$ mdbook serve
Concepts & Ideas
An Irdest network is created via the "Ratman" router, and other Irdest applications. Different devices can be connected together locally (via WiFi, ethernet, or long-range radio) or over the internet, as a virtual public network.
Network basics
An Irdest network is independent of traditional computer networking. Irdest traffic can be routed via the existing internet, but creates its own address space and routing rules. An Irdest network does not use IP addresses!
Instead an address is a cryptographic public key. This allows all data sent through the network to be encrypted and verified by default.
Because of the cryptographic nature of an address, a computer can also have many addresses online at the same time. Different addresses can either be used for different applications or for different identities via the same application (if it supports this). There is no central authority for handing out addresses. Every computer self-generates new addresses as they are needed.
Ratman architecture
The Ratman router is a program running on your computer that connects with other router instances and facilitates the exchange of messages by applications via this network.
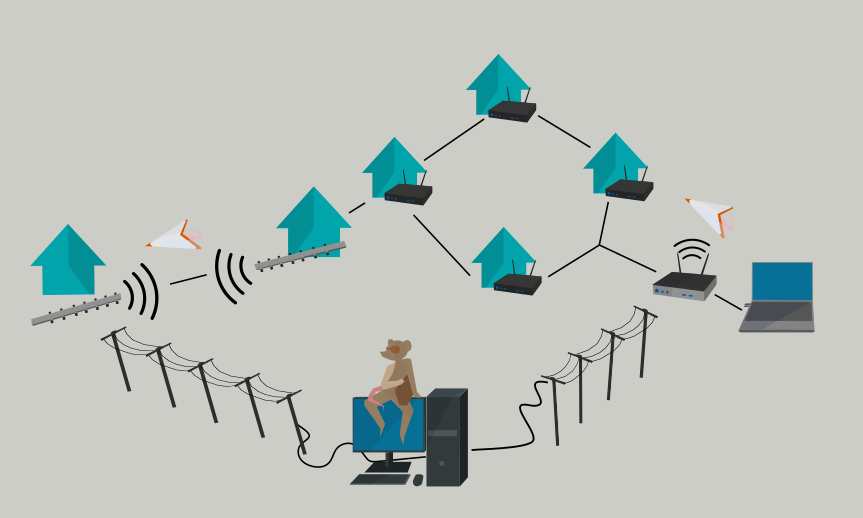
Connections between different Ratman instances are created via
specific connection drivers. Each driver allows Ratman to connect (or
"peer") with other instances of Ratman via some network channel. For
example netmod-inet allows Ratman to connect via the internet,
netmod-lora via a LoRa wireless modem, etc.
Since Ratman is not part of your operating system kernel and uses different addresses, special applications are needed to interface it with existing network infrastructure (the web, your favourite video game, etc).
For this purpose Irdest comes with a set of plugin-applications.
Currently this is only irdest-proxy, which can tunnel IP traffic
through an Irdest network. Additonal plug-ins can be written via the
Ratman developer tools.
Routing
Irdest is a mesh network, which means that anyone on the network can communicate with anyone else by passing messages to participants in between you and your recipient. This also means that there is no central authority on how packets is transported.
When registering an address, Ratman starts announcing it to its neighbours (Ratman instances that it is peered to). These neighbours can then send messages to the new address.
When a Ratman instance receives an announcement, it updates its own routing table, and then passes the announcement onward to any neighbours that it things haven't seen the announcement yet.
Via this mechanism an address will sooner or later be known by the whole network.
When sending a message to a particular address a router checks which neighbour the address was announced from, (picks the best one if there are multiple), and then sends data to that neighbour. This is repeated by any intermediary router until the message reaches its destination!
This means that no single network participant can know the layout (or "topology") of the network, slow nodes in between two points will be avoided if other routes exist, and when creating a new address, it will take some time until other network participants will be able to communicate with that address.
How to install Irdest
Irdest is mainly being developed on Linux, but partially supports macOS as well. If you have a Windows computer, you can help test things!
A package for your Linux distribution may be available (check the Irdest website download page for an overview).
We recommend you only use up-to-date packages, due to the fast rate of change in the project at the moment. If no up-to-date package is available, you can use the Irdest stand-alone installer, detailed in the next section.
If the installer doesn't support your platform you can alternatively install Irdest from source.
Supported platforms
x86_64-linuxaarch64-linuxarmv7(for OpenWrt)
Stand-alone installer
This installer creates a per-user installation of Ratman, which doesn't require root access. It comes with the Ratman router, the basic tools of interacting with it, a manual, and some setup scripts that can be used to customise the installation.
You can find the download bundle link at the bottom of the download page.
Unpack bundle
You can unpack the bundle with tar either on the terminal, or via
your graphical file browser.
$ tar xf Downloads/irdest-bundle-x86_64-x.x.x.tar.gz
$ cd Downloads/irdest-bundle-x.x.x/
$ ls
bin/  dist/  install*  man/  manual/  README.md
Install or upgrade
If you have an existing or older installation of Ratman installed, it's recommended to uninstall it completely first. Currently there is no compatibility between Ratman versions!
$ ./uninstall
$ rm -r ~/.config/ratmand/ ~/.local/share/ratmand
Then run the installer:
$ ./install

  ██████╗  █████╗ ████████╗███╗   ███╗ █████╗ ███╗   ██╗
  ██╔══██╗██╔══██╗╚══██╔══╝████╗ ████║██╔══██╗████╗  ██║
  ██████╔╝███████║   ██║   ██╔████╔██║███████║██╔██╗ ██║
  ██╔══██╗██╔══██║   ██║   ██║╚██╔╝██║██╔══██║██║╚██╗██║
  ██║  ██║██║  ██║   ██║   ██║ ╚═╝ ██║██║  ██║██║ ╚████║
  ╚═╝  ╚═╝╚═╝  ╚═╝   ╚═╝   ╚═╝     ╚═╝╚═╝  ╚═╝╚═╝  ╚═══╝


This installer will determine how to install Ratman on your system!
(NEW) bin/ratmand -> /home/.local/bin/ratmand
(NEW) bin/ratcat -> /home/.local/bin/ratcat
(NEW) bin/ratctl -> /home/.local/bin/ratctl
(NEW) man/ratmand.1 -> /home/.local/share/man/man1/ratmand.1
(NEW) dist/ratman.service -> /home/.config/systemd/user/ratman.service
Do you want to proceed? (Y/n)
Install /home/.local/bin/ratmand: OK
Install /home/.local/bin/ratcat: OK
Install /home/.local/bin/ratctl: OK
Install /home/.local/share/man/man1/ratmand.1: OK
systemctl daemon-reload: OK
Operation complete!
Configuration and setup
The installer creates a service file for auto-starting Ratman. But this service is not enabled by default. You can either run Ratman manually on every start-up:
$ systemctl --user start ratman
Or you can setup auto-starting by "enabling" the service:
$ systemctl --user enable ratman
Verify that Ratman is running correctly:
$ systemctl --user status ratman
● ratman.service - A decentralised and peer-to-peer packet router
     Loaded: loaded (/home/.config/systemd/user/ratman.service; static)
     Active: active (running) since Wed 2022-10-05 20:19:14 CEST; 2s ago
   Main PID: 353991 (ratmand)
      Tasks: 18 (limit: 56248)
     Memory: 2.2M
        CPU: 6ms
     CGroup: /user.slice/user-1000.slice/user@1000.service/app.slice/ratman.service
             └─353991 /home/.local/bin/ratmand --accept-unknown-peers

Oct 05 20:19:14 theia systemd[3325]: Started A decentralised and peer-to-peer packet router.
Oct 05 20:19:14 theia ratmand[353991]: Oct 05 20:19:14.265  INFO ratman::daemon: Initialised logger: welcome to ratmand!
Oct 05 20:19:14 theia ratmand[353991]: Oct 05 20:19:14.265  INFO new{bind="[::]:9000" name="ratmand" mode=Dynamic}: netmod_inet: Initialising Tcp backend
Oct 05 20:19:14 theia ratmand[353991]: Oct 05 20:19:14.265  INFO netmod_inet::server: Listening on Ok([::]:9000) for incoming connections
Oct 05 20:19:14 theia ratmand[353991]: Oct 05 20:19:14.266  INFO ratmand: Auto-selected interface 'wlp3s0' for local peer discovery.  Is this wrong?  Pass --di>
Oct 05 20:19:14 theia ratmand[353991]: Oct 05 20:19:14.266  INFO netmod_lan::socket: Sent multicast announcement
Oct 05 20:19:14 theia ratmand[353991]: Oct 05 20:19:14.266  INFO ratman::daemon: Listening for API connections on socket 127.0.0.1:9020
Remember to restart Ratman after changing the configuration file at
~/.config/ratmand/config.json -- changes are not automatically
picked up (yet)!
Build from source
Generally we recommend you install Irdest through your platform's package manager (if a package is available), or via our stand-alone installer.
However if no pre-built binaries exist for your platform you can use these instructions to build Irdest from source! However please also come by our Matrix room and tell us what platform you are using Irdest on! We may be able to build binaries for you as part of our CI pipeline.
Download latest source
First you will need to download the latest sources for Irdest. You can find a link to the last release on the website, or via the Gitlab repository!
In case you have git installed on your system and would like to
follow along with the development version you can clone the repository
as follows:
~ $ git clone https://git.irde.st/we/irdest
~ $ cd irdest/
Optionally you can only clone a particular release branch (default
branch is develop):
$ git clone https://git.irde.st/we/irdest --branch release/ratman-0.4.0
Installing dependencies
You will need the following dependencies for building Irdest:
- rustc (minimum version ?)
- cargo
- pkg-config
- protobuf-compiler (with support for
proto3) - libudev
- llvm
- clang
On macOS you will need the Security framework from the Apple SDK.
Commonly these packagse can be installed as follows. Note that there is a wide range of operating system setups and so these instructions can not be comprehensive!
- Ubuntu:
sudo apt install rustc cargo pkg-config protobuf-compiler clang-dev llvm-dev libudev-dev - Arch:
sudo pacman -Sy rustc cargo pkg-config protobuf3 clang llvm libudev
Nix builds
Nix is a package manager and build tool which is used during Irdest development and CI. It is easy for documentation to go out of date and forget to mention a dependency or update a package name. Since we use Nix builds during development they will always be up-to-date.
Installation and usage is a bit more involved than simply installing packages, but it may be worth it if you plan on following along development regularly, or embedding the update process into other automation!
Follow the instructions on how to install nix on your platform here.
After installation you should be able to build the Irdest bundle as follows:
$ nix-build nix/ -A irdest-bundle
$ result/install  # then run the installer
You can also fetch development dependencies by running nix-shell in
the Irdest repository root!
Cargo builds
Since Irdest is written in Rust, you can compile it with Cargo! Once you have all required dependencies installed you can invoke cargo as follows
~/irdest $ cargo release -p ratman --release
   Compiling version_check v0.9.4
   Compiling proc-macro2 v1.0.36
   Compiling unicode-xid v0.2.2
   Compiling syn v1.0.85
   Compiling libc v0.2.112
   ...
    Finished release [optimized] target(s) in 1m 02s
Other buildable targets or features not enabled by default can be found in the [build reference].
Firmware
Note that Irdest contains some components that require embedded
firmware. This can be found in the firmware directory in the Irdest
repository.
Cross-compilation is extremely difficult! There are shell.nix
files in each of the firmware sub-projects that configure and install
a cross-compilation build environment.
We strongly recommend using Nix to compile and flash your own firmware. We unfortunately can't give support for setting up cross-compilation bulid environments on other systems, since they are so numerous and complicated to configure!
Setup Guides
This section of the manual focuses on practical setup instructions for an Irdest network with Ratman and other applications. Each guide is tailored to a specific use-case, with some being more broad than others.
Ideally your use-case will be covered. In case it is not, hopefully you can adapt one of the existing guides to your settings. But please also feel free to talk to us about what the documentation should include!
Basic setup
We trust that you have successfully installed Ratman (ratmand,
ratcat, ratctl) on your system. Please refer to the
Installation section for details.
The Ratman daemon is primarily set-up from a configuration file. You can find it at the following path, depending on your operating system:
- XDG system:
$XDG_CONFIG_HOME/ratmand/config.json. - macOS:
Users/[USER_NAME]/Library/Application Support/org.irdest.ratmand
Ratman also stores some runtime state. This includes registered local addresses, known network peer addresses, connection statistics, and in-transit messages. Delete these directories to wipe all data and re-start Ratman from a blank slate.
- XDG system:
$XDG_DATA_HOME/share/ratmand. - macOS:
/Users/[USER_NAME]/Library/Application Support/org.irdest.ratmand.
Since Ratman is still in alpha it may be neccessary to wipe application state in-between updates! Please do not rely on this software yet!
Public internet test network
As part of the Irdest project we put up a small test network between our servers. You can join it via the internet! This network is meant for testing the performance and stability of the Irdest tools. If you are a developer you are welcome to interact with this network with your own applications.
First, make sure that Ratman is configured to support inet peering!
{
  ...

  "inet_bind": "[::]:9000",
  "use_inet": true,
  "peer_file": "public-test-network.pm",

  ...
}
Download public-test-network.pm (coming soon!) and place it next to the Ratman configuration. After that, restart Ratman!
$ systemctl --user restart ratmand
Next up you can check the router dashboard for incoming address announcements by navigating to localhost:8080 in your browser!
Public services
If you are running a public test service, feel free to submit it for inclusion in this manual. The service must be open source!
| Service name | Description | Address(es) |
|---|---|---|
| irdest-echo | Accepts messages and echos them back to the sender |
OpenWrt setup
The OpenWrt Project is a Linux operating system targeting embedded devices. Irdest Ratman is available as a package for OpenWrt via our CI for some architectures.
Prerequisites
This is only tested for
armv7l32-bit architecture. e.g. this is tested withLinux OpenWrt 5.10.146 #0 SMP Fri Oct 14 22:44:41 2022 armv7l GNU/Linu.musl libc (armhf)stdlib.
Download
You can do these steps on the router itself or on your machine. If you did the
above on your machine, then you need to copy the .ipk file to your router.
The complete set of instructions may look like this.
- Download the package file using
wgetorcurletc.wget -O artifacts.zip "https://git.irde.st/we/irdest/-/jobs/53163/artifacts/download?file_type=archive" - You will have artifacts.zip here; unzip it
unzip artifacts.zip - You will have .ipk file here like "ratman-openwrt-0.5.0-1_arm_cortex-a9_vfpv3.ipk". Copy that to the router running
OpenWrt.
scp ratman-openwrt-0.5.0-1_arm_cortex-a9_vfpv3.ipk remote-server:/root/
Installation and check
- Run the package installer
Possible output 👍root@OpenWrt:~# opkg install ratman-openwrt-0.5.0-1_arm_cortex-a9_vfpv3.ipkInstalling ratmand (0.5.0-1) to root... Configuring ratmand. - Check
Possible output 👍which ratmand/usr/bin/ratmand - Run
Possible output 👍root@OpenWrt:~# ratmandLoading config from "/root/.config/ratmand/ratmand.kdl" Nov 22 17:58:24.571 INFO ratmand::util: Initialised logger: welcome to ratmand ...
Future plans
- Create a package for OpenWrt and have it available via their feeds. Some links to help you get started. You can ask
Aman (aj@amanjeev.com) about where he is right now in this process.
- Get started with their packages and feeds.
- Packages repository on GitHub.
- Routing packages repository on GitHub which is where Ratman is likely to be.
- Test this and create this package for other more common architectures for routers.
- Release other Irdest Ratman tools and binaries for the OpenWrt ecosystem.
How to
This section outlines how to accomplish specific technical goals with Irdest. For more in-depth "step-by-step" guides, check out the Setup Guides section instead!
Wi-Fi setup
⚠️ If you have not already done so, please read the Basic setup section of the manual. It will be referenced frequently.
⚠️ Please note that the interface described in this file will be subject to change as the project matures. It is not recommended to use this module without a dedicated wireless interface yet as it will disrupt other network stacks.
⚠️ Only Linux is currently supported.
If you wish to use the network autoconfiguration features, NetworkManager must be installed and running on your machine. The interface requires privileges as it accesses Linux's ethernet network stack directly.
TLDR
Setup
At the moment, there are 3 ways of using the raw networking module
that powers the wifi connectivity depending on how you supply the
configuration to the module. The configuration fields of interest are
called ssid and datalink-iface. The first expects the utf-8
ONLY ssid name and the second expects the OS's interface name, such
as wlan0, wlp1s0, wlo0, etc. They can be configured as follows:
-
Remove the SSID field from config.json and only supply the interface field. The endpoint will attempt to connect directly to the given device. This works well for accessing local peers over wifi or ethernet and in cases where manual configuration of the wireless device is desired.
-
Provide both the SSID and interface fields. The endpoint will then attempt to use NetworkManager to scan for the given SSID and connect to it. If it is not found, a new ad-hoc network will be created that can then be joined from other device.
-
Provide only the SSID and remove interface field. The endpoint will attempt to scan over all available wireless interfaces to find the given SSID. If it is not found, a device will be picked and a new ad-hoc network will be created that can then be joined from other devices.
Advanced configuration (manual)
It would be nice to support Wi-Fi Direct and VIF auto-configuration on Linux. These can currently be manually configured with your tool of choice (iw, wpa_supplicant, etc.) and used in ratman via the first configuration method.
Troubleshooting
Ratman panics on startup
Ensure that you have the correct permissions. This means you can either run the process as root (not recommended) or with CAP_NET_RAW and CAP_NET_ADMIN.
You should be able to set the required permissions by running the following
command as root:
setcap cap_net_raw,cap_net_admin+eip [path/to/ratmand]
See man capabilities and man setcap for more details.
Network Manager configuration times out
This is generally due to issues with device drivers. There's a good chance that your device drivers:
- are improperly configured
- are buggy
- do not support being set to AP mode
The devs are working on a list of recommended hardware.
Why can't I connect to the internet?
This endpoint captures all packets sent to the given device. If you had any higher level network protocols operating on it, you're out of luck at the moment. This may change in the future.
LoRa radio setup
LoRa is a low-power long-range wireless communication standard. This guide will walk you through setting up two LoRa modems and running a Ratman connection over it. Following is the hardware list you will need:
| Item | Description | Notes |
|---|---|---|
| ST Microelectronics NUCLEO-F401RE | STM32 micro controller development board | Currently only this board and CPU is supported, there is no reason for this selection other than it being available during the parts shortage at the time we ordered the parts. The firmware should be easily adaptable to any device that is supported by the Rust Embedded project. The only hard requirements are 1 Serial port and one SPI interface. |
| Seeed Studio Dragino Lora Shield 868m | LoRa wireless shield - Arduino Uno Formatted. | This module was selected as it fits directly on our dev board making development much easier. The module listed here is tuned for the European frequency band. Care must be taken to purchase the appropriate module for your region, more info below. The firmware supports any sx127 series modem, which is available on a wide range of hats, shields etc. |
TLDR
Following is a video demonstrating how you can send messages through
ratcat via the LoRa link.
⚠️ Disclaimers ⚠️
⚠️ A very serious warning about Radios
LoRa is a low level radio protocol. Unlike most common WiFi and Bluetooth modules LoRa radios will not hold your hand or stop you from getting yourself into trouble.
LoRa exists in the ISM band of the radio spectrum, which is regulated such that a user does not require a standard broadcast or operator licence.
Because there are no strict training requirements for operating LoRa equipment there is the dangerous possibility that an uninformed operator could begin transmitting without knowledge of their legal requirements.
Among other things the LoRa band has regional restrictions on:
- With how much power can you transmit
- What equipment can you use
- How frequently and how long can transmit for (duty cycle)
- Which frequencies you can transmit on
- Some Jurisdictions may also have restrictions on what content can be transmitted.
Most Nations are very vigilant about how their radio spectrum is used, and have deployed a network of listening stations to enforce breaches of radio law. Sadly breaches are often considered to be matters of national security, and the law will not likely be lenient on a hacker playing with a radio.
If you violate broadcasting laws repercussions can include:
- Hefty Fines (in the order of 10's of thousands of €/$/£'s)
- Court appearances, and a criminal record
- Confiscation of any radio equipment, and probation terms which prevent acquiring more.
- Revocation of any radio licences you may hold
- In extreme cases, or repeated offences, jail time.
- Irdest additionally transmits encrypted data, which means if you give the authorities a reason to you may be charged with Espionage, Terrorism, or Computer Misuse.
Please be aware of these factors before setting up a LoRa Irdest endpoint!
⚠️ No stability, no warranty
Irdest is a research project. Do not deploy this! (yet)
Irdest is a not ready for deployment, it's LoRa components do not implement any guarantees of compliance with any regions laws, it particularly egregiously violates the duty cycle requirements. Irdest currently is only suitable for use in a laboratory environment for short term usage.
Naturally Irdest comes with no warranties of merchantability, fitness for use, or even being legal to operate. We will not be held responsible if you are found in violation of your local radio laws though using our hardware or software (which you will be, and you will be caught)
Frequencies
Different parts of the world slice up the radio spectrum for different users differently. Because of this LoRa exists at different frequency bands:
- 868Mhz (Europe)
- 915Mhz (North America)
- 486Mhz (China)
- Others depending on region.
Your equipment and software must both be configured for the correct frequency band. Very unfun things happen when you do not do this. For instance in Europe the American LoRa band (915MHz) overlaps with the European emergency services backup frequencies. Transmitting on these frequencies is a severe criminal offence.
Duty Cycle
LoRa's use of the ISM band is stipulated under the condition that no site (transmitter) will actively transmit for more than 1% of the time. This is calculated as no more than 36 seconds in any 1 hour window. Violation of this requirement can cause harmful interference with other users of the LoRa network. Keep in mind that LoRa can have a range of up to 10Km, so you likely will not know of this interference until a police officer comes to tell you to stop. Irdest will violate this 1% requirement and likely interfere with other LoRa users
Setup
Ok, enough scaremongering.
Collect equipment and prepare environment
The BoM table above specifies the parts for one station. For a useful
setup you'll need at least two. In addition you'll also need a
mini-USB cable and a separate computer for each station. Both
ratmand and the radio's debug bridge can only be run once on a
computer, so you will need two computers!
Assembling the radio components is easy. Press the radio shield into
the arduino connector on the CPU dev board. Next three jumpers SV2,
SV3, SV4 need to be switched such that they connect the two pins
toward the back of the dev board, furthest from the antenna connector,
on each jumper respectively. Finally connect the antenna.
Make sure you select small low gain antenna for a lab setup, and where possible position your lab as low as possible in the world. Underground is best. If you're particularly paranoid you can put your test setup in a shielded box or Faraday cage.
Read the warning about Radios again!
Reminder: Irdest is not yet compliment with all LoRa radio requirements, only build a test environment low down, with low power antennae, and operate it for as short as needed to run your test.
Configure lora-modem firmware
In case you live in Europe or North America you can download the
irdest-firmware bundle from the Irdest website! Then follow the
instructions in the README.
If you live outside these two regions you can refer to the Build from source section on how to get a copy of the source repository.
The FREQUENCY field in /firmware/lora-modem/src/main.rs {develop branch}
needs to be set for your region (see above).
If you have trouble determining the used frequency in your region, contact us and we'll help you figure it out.
Anywhere else contact us and we'll help you figure it out, cos it's not always clear how the different ISM bands map onto this one i64 value from our driver crate provider.
Build the firmware
To build you will need to install the arm thumbv7em-none-eabihf
target on your system. Refer to the Cross compilation section for
details.
rustup target install thumbv7em-none-eabihf
You will also need to install arm-none-eabi-gdb. This is packaged on
Ubuntu and Arch, there's a COPR on Fedora.
The following steps need to be run from the firmware directory, so
switch into firmware/lora-modem.
In one terminal run sudo openocd (also needs to be in the firmware
directory) This will open the debug port the the micro-controller and
start a socket for gdb to connect to. Your dev board should now have a
rapidly flashing green/red LED on it.
Next in a second terminal run cargo run --release this will compile
the software and start a gdb session which will upload the firmware to
the micro-controller. The release flag is always required due to the
very tight timing requirements faced by processing serial data on a
micro-controller.
After a few moments for the upload to complete you will be met with at
(gdb) prompt. The micro-controller's CPU is halted at the beginning
of main and ready to start. type c followed by enter to start the
firmware.
Configure ratmand
Please make sure that you have installed Ratman on your system and run at least once so that default configuration files could be created
Next, plug your dev board in and search for it's serial port path. It
should be in the form of /dev/ttyACMx where x is a number.
Modify your ~/.config/ratmand/config.json to include:
  "addr_announce_rate": 30,
  ...
  "lora_port": "/dev/ttyACMx", #your path here
  "lora_baud": 9600,
  "no_lora": false,
  ...
The addr_announce_rate parameter is by default set to 2. Because
LoRa is a low-bandwidth connection you may want to reduce the announce
rate to not saturate the link with only address announcements.
In the future this work-around should become uneccessary.
Start ratmand
When testing only the LoRa connection we disable the inet and lan
drivers to restrict peering over the radio modem.
$ cargo run --features lora --bin ratmand -- --no-inet --no-discovery -v trace
Sending messages
$ ratcat --register
$ ratcat --recv
$ echo "Hello LoRa on $(date)" | ratcat <addr from other computer>
Questions?
Anything this guide didn't cover? Please come talk to use in the Matrix channel!
Reference
A general reference for configuration options and terms. Every component is organised into its own section and can explain more context than the built-in help text of many tools.
Note: keeping a reference section of a manual up-to-date is hard and can sometimes be forgotten. If you find any part of this reference to be out-of-date, please open an issue about it!
Documentation patches welcome! 🥺
Ratman Daemon
State
Ratman stores some amount of state in:
- XDG system:
$XDG_DATA_HOME/share/ratmand. - macOS:
/Users/[USER_NAME]/Library/Application Support/org.irdest.ratmand.
If you want to wipe all registered addresses simply delete the
directory and restart ratmand.
Example usage
It's recommended not to use inet peering to connect to devices on
the same network as you, since the lan module takes care of this
already.
The most barebones way to launch Ratman is with the following command,
which doesn't by itself attempt to peer with anyone via the inet
module, but will accept incoming peer requests from the outside. This
also runs the lan module in the background.
$ ratmand --accept-unknown-peers
We recommend you use the -v debug flag to increase the log volume
for Ratman in case you run into any issues (info logging is very
sparse at the moment!)
The Irdest project runs a set of peering servers. To start your daemon to connect to one of them you can use the next command.
$ ratmand -p 'inet#hyperion.kookie.space:9000' -v debug
This creates a connection to the peering server, meaning that the server doesn't need to be able to reach you if you are behind a firewall. This is however enough to get you access to the rest of the Irdest test network!
Beware trying to peer computers on the same local network this way, as
it may cause loops with the lan discovery module, which are not
currently handled very well. You can also disable local discovery
with --no-discovery.
To demonstrate that you are indeed connected you can use ratcat in
combination with the irdest-echo application, as outlined
here!
The following section outlines each commandline option and what it does in more detail!
Ratman daemon Usage.
Ratman comes with various commandline arguments to configure its
behaviour. The main usage of the program can be queried via the
--help flag. This section will describe flags in further detail.
--accept-unknown-peers
By default Ratman rejects unknown incoming peer requests. To disable this functionality you need to pass this flag.
Note: if you want to run Ratman without having to provide a set of peers to begin with (for example to purely act as a peering server) then you must also provide this flag.
--no-inet
By default Ratman tries to bind the inet overlay driver to connect to peers across the internet. To disable this functionality you can pass this flag.
--no-discovery
By default Ratman runs a local IPv6 multicast discovery driver which will find other Ratman instances on your local network to peer with. This flag disables that functionality.
--no-dashboard
By default Ratman runs a small web server on port 8090 to display a usage and network state dashboard. If this is unwanted you can turn off this functionality.
-b, --bind
This parameter flag allows you to override the default listening port
for Ratman IPC connections. This is useful in case you want to run
multiple routers on the same machine, but will cause issue with
applications that don't allow you to specify the IPC connection socket
address (for example irdest-echo)!
--inet
Specify the bind address and port for the netmod-inet overlay driver. It supports both IPv6 and IPv4 address schemas.
**Note: when binding to either IPv4 or IPv6 specifically it makes it impossible for a peer of the other version to properly peer with you. This is an open issue tracked here!
-p, --peers
This multi-parameter flag allows you to specify an initial set of
peers to connect to. The syntax used for this is called PEER_SYNTAX
and used across various companents in Irdest.
A peer is expressed as follows:
<netmod>#<address>:<port>
<netmod>refers to name of the netmod that the peer should be introduced to. Currently the only valid netmod-identifier isinet.<address>contains the main address part. Domain names (provided you have a working DNS setup) are also accepted.<port>finally the port to connect to
-f, --peer-file
Similar parameter to -p, -peers, but pointing to a file instead.
This file must then contain a peer formatted in PEER_SYNTAX on each line.
-v, --verbosity
Ratman can be configured to log more or less, depending on your needs. Following is a breakdown of available log levels and how they are generally used.
error-- Only print enexpected behaviour that has caused some operation to fail. This does not mean that the whole router is crashing, but may be an early indicator of a faultwarn-- Only print for unexpected behaviour that doesn't otherwise impact the operation of the router.info-- print at most one statement for each high-level component action. It is possible to gauge the general operation of the router from just these messagesdebug-- print at most two statements for each operation (for example "start" and "finish"). Debug messages are pleanty because all components emit them, but limit their re-occurence in each component.trace-- includes individual step to each operation with no real limit on recurrence
Ratcat
A tool similar to netcat that allows you to interact with a Ratman
network from various scripts and small programs.
Before you can send messages you need to call ratcat with the
--register flag. This will register a new address with your local
router. Afterwards you can send and receive messages.
Sending messages
ratcat will read a message either from the commandline arguments or
from standard input. In either case, the first required parameter is
always a recipient.
A recipient is a Ratman address, which has the following format:
ECB4-30B9-4416-C403-716F-601F-FC56-9AD3-BD2E-3892-227A-84AD-E6FC-A1CE-0A92-03F6
So to send a short message to this address you would call:
$ echo "Hello ECB4... do you have a nickname?" | ratcat 'ECB4-30B9-4416-C403-716F-601F-FC56-9AD3-BD2E-3892-227A-84AD-E6FC-A1CE-0A92-03F6'
Receiving messages
ratcat can also be set to receive messages. For this simply provide
the --recv flag. This will wait forever and print messages (or to
standard output if a pipe is connected). You can limit this behaviour
with --count which takes a number as argument.
For example, the following invocation will wait for an incoming
message and then pipe the resulting output into json_pp. Any errors
or warnings are printed to standard error.
$ ratcat --recv --count 1 | json_pp
You can also combine message sending with receiving (simply call
--recv after the recipient/ message info)
State
ratcat stores your last registered address in:
- Linux/ BSD/ XDG system:
$XDG_CONFIG_HOME/ratcat/config. - macOS:
/Users/[USER_NAME]/Library/Application Support/org.irdest.ratcat.
Ratctl
A very simple utility commandline tool to interact with the Ratman router. Currenly its main purpose is to inform you of existing peers on the network.
$ ratctl --get-peers
Connecting to IPC backend...
      ,     .
      (\,;,/)                    (\,/)
       (o o)\//,                 oo   '''//,        _
        \ /     \,             ,/_;~,        \,    / '
        `+'(  (   \    )       "'   \    (    \    !
           //  \   |_./              ',|  \    |__.'
         '~' '~----'                 '~  '~----''
                R A T    C O N T R O L

ECB4-30B9-4416-C403-716F-601F-FC56-9AD3-BD2E-3892-227A-84AD-E6FC-A1CE-0A92-03F6
This tool will be extended with functionality in the future.